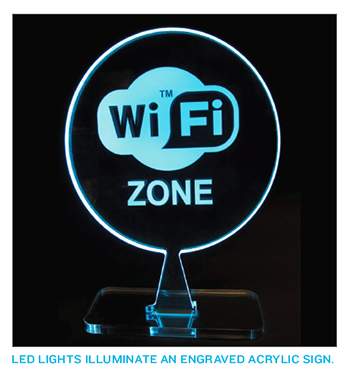
From in-store displays to highway billboards, lighted signage is everywhere. Did you know that you
can create some pretty amazing lighted signage using little more than the laser system you already
own? It’s easier than it looks, even if you don’t know where to begin. The three most important
aspects of creating a successful lighted sign are materials, design, and construction.
Lighted Signage A Bright Idea
Illuminating Your Laser-Cut Acrylic is Easier than it Looks
James Hays | UNIVERSAL LASER SYSTEMS
Everything is bright
these days.
 From in-store displays to highway billboards, lighted signage is everywhere. Did you know that you
can create some pretty amazing lighted signage using little more than the laser system you already
own? It’s easier than it looks, even if you don’t know where to begin. The three most important
aspects of creating a successful lighted sign are materials, design, and construction.
From in-store displays to highway billboards, lighted signage is everywhere. Did you know that you
can create some pretty amazing lighted signage using little more than the laser system you already
own? It’s easier than it looks, even if you don’t know where to begin. The three most important
aspects of creating a successful lighted sign are materials, design, and construction.
Selecting Materials
Special attention must be paid to your acrylic and your light source. The quality of these two components
will have as large an effect on the success of the sign as the design and construction of the
sign itself, so choose them carefully.
- Acrylic: Not all acrylic is created equally. Some types work better than others when making lighted signs, especially when a sign is lit from the edges. For our in-house projects at Universal, we have found that LuciteLux Vario is an excellent choice for lighted signage. This type of acrylic traps light inside the panel, where it bounces back and forth until it hits an edge or mark in the acrylic, at which point it is released. It’s also available in multiple colors.
- Light source: If the light isn’t bright enough, it won’t matter how brilliant your design is. The shape of the light source is also a factor. Some LEDs are round, but we have found that square LEDs work better for most signage applications. We purchased our LED strips from LightBoard Technologies.
There are also materials besides LEDs that can be used as light sources. Electroluminescent lamps are very thin, flexible materials which light up when power is applied. These materials are very easy to work with when using a laser and can open up some really unique designs.
- Other materials: Reflective tapes are useful to keep light from leaking out where you don’t want it, maximizing the illumination of your sign. 3M makes excellent thermally conductive reflective tapes.
Design Choices
Designing lighted signs requires special care. Adding lighting to an engraved sign can affect the look in ways you might not expect.
Keep in mind that vector engraved lines will appear to glow in the same color as the acrylic. The amount of light released by the line (the brightness) varies based on the depth of the line. Generally, deeper engravings appear brighter. Laser cuts will be the brightest, because they create the largest area for the light to be released. And because the engraved parts will be brighter than the unengraved parts, you will probably want to reverse your image, changing the black parts to white and the white parts to black, to get the desired look.
Every mark, cut, or engraving allows light to escape the sign. If you make a lot of engravings or marks near the light source—near the edges for an edge-lit sign or the bottom if you’re using a light base—too much light may escape and your sign may appear dimmer than desired in some areas. Imagine the path of the light as it travels through the acrylic of your sign. If you see any points where all the light has to squeeze through a narrow piece of acrylic, the area at the other end of that piece of acrylic may not be as bright as you’d like. This is especially important when using a light base, which supplies light from only one side. The light has to travel up from the bottom to illuminate the entire sign. If you cut away large parts of the acrylic near the base, there will be a smaller area for the light to travel through and it won’t reach the top of the sign as easily.
There are many different ways to illuminate the sign we’ve created. Two of the most common methods are light bases and edge lighting.
Construction: Light Bases
This is one of the simplest ways to get started with lighted signage. A design is engraved on the acrylic, and a light base projects light up from the bottom. Engraved parts of the sign light up. A light base is a good choice for a largely rectangular sign. Oddly shaped signs may allow too much light to escape from the edges. Just because the acrylic should be rectangular doesn’t mean you should limit your creativity! Experiment with designs and patterns or try embedding objects in the cut acrylic, as we have in our sample.
Constructing a sign lit by a light base is as simple as inserting the acrylic into the base. Light bases can be purchased online, but it is less expensive and easy to make your own.
To make a light base, you will need:
- Aluminum C Channel, 1/16 in. thick by 3/8 in. by 96 in.This is available from any hardware store. The width of the C channel must match the thickness of your acrylic. If you want to make a sign that uses 3/8-in. thick acrylic, you should get a C channel that is 3/8-in. wide.
- Standard 12-volt power supply.
- Wood, plastic, or metal for feet. Wood or plastics can be laser cut to desired shape.
- an LED strip


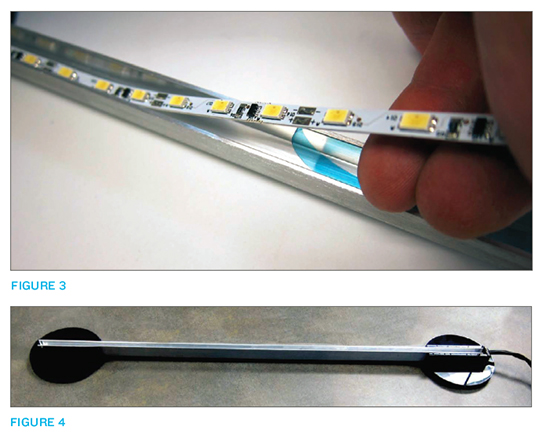
Design a simple stand for the C channel (FIGURE 1) and use the laser to cut out the parts. We used black acrylic for the stand in this example. You can attach felt or cork to the feet of the base to keep it from slipping. Adhesive tape in the base’s slots will help secure the sign (FIGURE 2).
Peel the adhesive from the back of your LED strip and stick the strip into
the center of the aluminum C channel (FIGURE 3). Insert the channel
into the laser-cut stand and connect the 12-volt power supply, following
instructions from the LED strip’s manufacturer (FIGURE 4). Insert your
laser cut acrylic into the base and turn it on (FIGURE 5). It’s that easy!

Construction: Edge-Lit Signs
Lighting a sign from all of the edges gives you a little more design
freedom. This is a good approach if you want to make an irregularly
shaped sign.
To make this edge-lit sign, we used:
- Light tape electroluminescent strips with power supply
- Translucent double-sided tape
- Black electrical tape
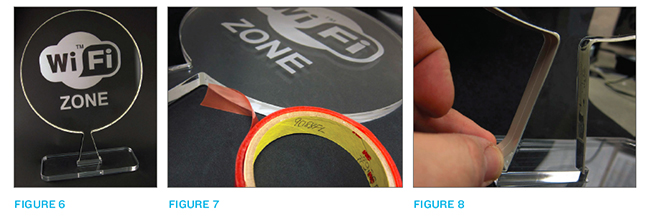
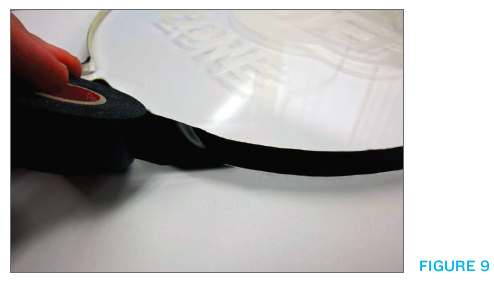
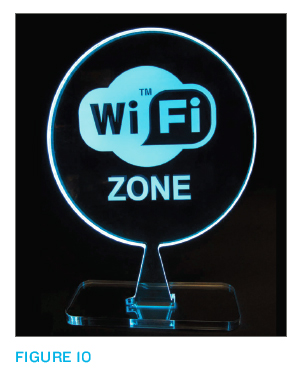
First, cut and engrave acrylic that is ½-in. or thicker into your desired shape. Any shape is fine, even one with many angles and edges (FIGURE 6). Affix double-sided tape to the edges of the sign (FIGURE 7). Apply light tape to the sign with the lighted side facing inward (FIGURE 8). Wrap the edge of the sign in flexible black tape to give it a professional look (FIGURE 9). Use the power supply included with the light tape to illuminate the sign (FIGURE 10).
Experiment
These are only two methods for creating lighted acrylic signage with a laser. Now that you have the basics, have some fun with it and experiment! There are many more techniques and processes waiting to be discovered.
James Hays is technical marketing communications manager for Universal Laser Systems, an innovator in the field of laser engraving, laser cutting, and laser marking equipment. For more on Universal’s products and the materials and applications the laser systems can be used for, visit www.ulsinc.com.