It has been estimated that the total number of photos taken with film since film photography began is between 2 trillion and 3 trillion worldwide. That was before digital cameras and phones with built-in cameras changed everything. An estimated 3 trillion digital photos are expected to be taken or shared from a phone in the year 2017 alone.
3 Trillion Photos Need to Be Fixed
Improve Client Art with COREL Photo-Paint
BY SHON ROTI, JDS INDUSTRIES
(Originally printed in the January 2017
It has been estimated that the total number of photos taken with film since film photography began is between 2 trillion and 3 trillion worldwide. That was before digital cameras and phones with built-in cameras changed everything. An estimated 3 trillion digital photos are expected to be taken or shared from a phone in the year 2017 alone.
This does not mean that the percentage of good photos will increase, however.
Most people, including myself, are amateur photographers. Yes, camera technology built into phones continues to improve, but the skill level behind the camera has changed little—or in front of the camera, for those of you shooting selfies. Most of us are still taking photos that are out of focus and have poor composition and lighting issues.
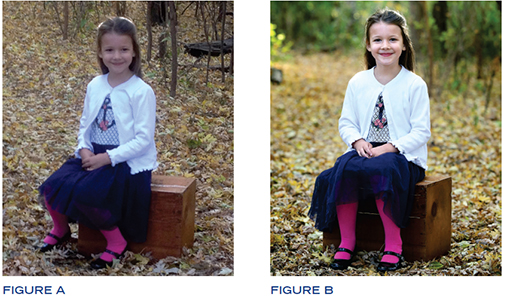
To illustrate this point, check out FIGURE A and FIGURE B. Figure A was a photo I took using an iPhone4S, and Figure B was taken by a professional, Emily Spartz, using a Canon 5D Mark III with a 24-105 mm lens. You can definitely see the value of the professional photographer and a good DSLR camera. Hiring Emily to take our family Christmas photos was totally worth it.
Not everyone has an Emily. If you are receiving a photo from your customer for a project, it probably was shot on a phone and will likely need some help.
MERGE MODES
In this tutorial, I'm going to present a better way to enhance a photo using Merge modes. Merge modes in Corel PHOTO-PAINT (like Blend modes in Adobe Photoshop) have been around since the program's inception, but many of us do not use them or even know what they can do.
To understand Merge modes, you first need to know that a photo is made up of small pixels, each with its own numeric color value. When an image is layered on top of another image using a Merge mode, a particular color calculation is done separately for each individual pixel color, depending on which mode is used. In short, these modes have the ability
to modify an image result depending on the base layer colors and the color of the layer above. Without using
a Merge mode, a typical flat color adjustment—such as the saturation or contrast/brightness settings— treat all the color pixels in the sameway. This is why I call them flat adjustments. Merge modes, on the other hand, are more complex and tailored in their adjustments and can result in a more natural or a more dynamic image, depending on the desired outcome.
The Merge modes used in this PHOTO-PAINT tutorial will be Normal, Overlay, Screen, and Soft Light. Other common Merge modes are Multiply, Add, Color Dodge, and Hard Light. I would encourage you to experiment with all the modes to understand the impact of each.
I am using Corel PHOTO-PAINT X8, but the tools and techniques will be largely the same in earlier versions of the software.
STEP BY STEP
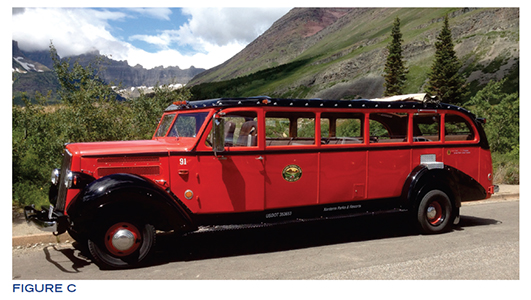
To start, open an image in PHOTO-PAINT. The image I'll use in the next steps was taken by me in Glacier National Park in July 2016 using an iPhone4S (FIGURE C).
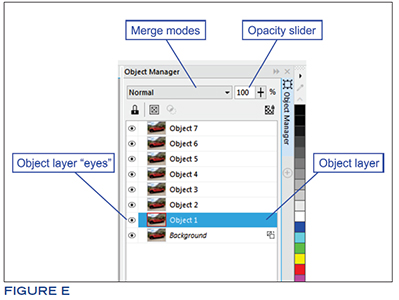
Go to Object>Object Manager—or use the shortcut keys, Ctrl+F7—to open Object Manager. Next, right click/select the Background layer, and select Duplicate or use Ctrl+D as a shortcut. Now repeat this until you have seven duplicate layers (FIGURE D). By default, all of these layers will be in Normal mode at 100% opacity.

A couple things that are good to know: In order to turn off a layer and remove it from view, click on the eye icon next to the layer (FIGURE E). When changing a Merge mode, click the dropdown menu (FIGURE E) for the Merge mode options. To adjust the layer's opacity, use the Opacity slider (FIGURE E). Before getting started, unselect all the eye icons except the layer being modified.
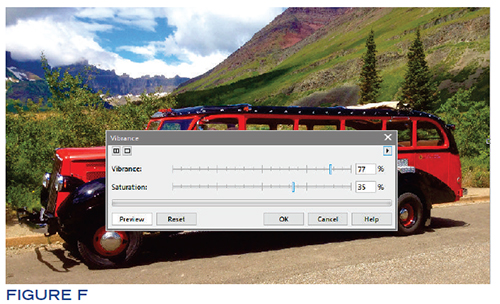
In the first Object layer, perform a flat adjustment to intensify the colors of the base layer. Click on the first layer, turn on the eye icon and go to Adjust>Vibrance. Move the Vibrance and the Saturation sliders significantly to the positive side (FIGURE F). This layer will stay in the Normal mode at 70% opacity. Don't worry if it looks oversaturated; this is only the beginning of the adjustments to the image. Likewise, every adjustment in each layer will appear unnatural at first, but after changing the layer's Merge mode and adjusting the opacity, you will find that the image will improve to something that looks more natural.
I will rename each layer as I go through these steps to give clarification to what each layer is doing. To change the layer name, double-click on the word "Object" in the layer and rename it.
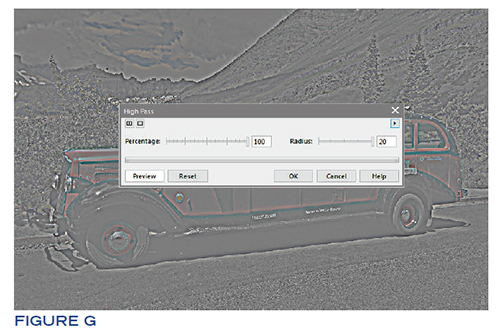
The second layer will provide more clarity in the details of the image. Click on the second layer and turn on the eye icon to view the layer. Go to Effects>Sharpen>High Pass. I've maxed out both sliders (FIGURE G). Notice that most
of the image has been rendered to about 50% gray, and only some darker edges and highlights remain. Now change the mode to Soft Light. This layer now merges seamlessly and naturally with the layer below but sharpens the image and brings out fine details. In Soft Light Merge mode, only the colors that are darker or lighter than 50% gray will be affected; colors darker than 50% gray will be darkened and colors lighter than 50% gray will be lightened. This layer can be duplicated one or more times to multiply its effect to further intensify fine details.
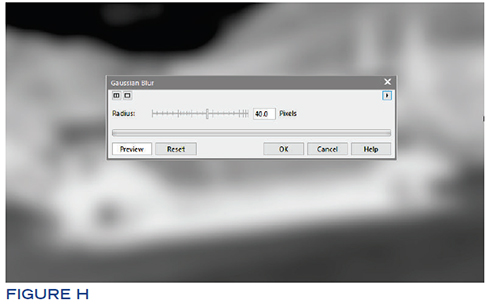
In the third layer, I want to correct harsh shadows
and highlights and make visible the details that would otherwise be lost, such as the shadows under the bus. Click on the third layer and turn on the eye icon. Go to Adjust>Desaturate. This will render the image to grayscale.
Next, go to Image>Transform>Invert. This creates a negative of the image. Go to Effects>Blur>Gaussian Blur and adjust Radius to about 40 pixels (FIGURE H). Change the mode to Soft Light. The inverted image in the Soft Light mode will lighten the darker areas of the image and darken the light areas. I've adjusted the opacity of this layer to about 60%.
Next, click on the fourth layer, turn on the eye icon, and change the mode to Overlay. This mode has the ability to create more contrast in the image in a realistic way. I've set the opacity of this layer to 60%.
We will change the fifth layer to the Screen mode. This will lighten the image. On the fifth layer, turn on the eye icon and change the mode to Screen. I've set the opacity on this layer to 40%.
The sixth layer will be used to
correct the overall blueish hue
of the image. Click on the sixth
layer and turn on the eye icon. Go
to Adjust>Desaturate. This will render the layer to grayscale. Go to Adjust>Color Balance and adjust the sliders, adding more red and yellows in the Midtones (FIGURE I). This will give the layer a sepia-tone effect.
Now change the mode to Soft Light and move the Opacity slider to 40%. This step will "warm" the colors of the image without creating unnatural yellowing in the clouds and other white areas of the image.

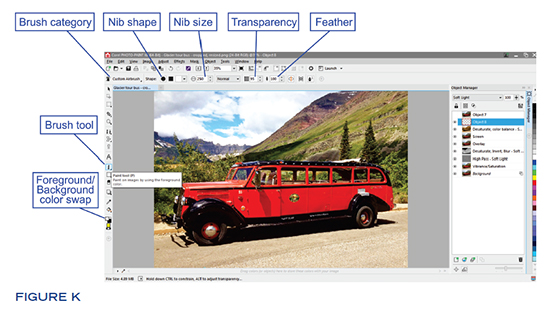
If there are still a few specific
areas in the image that need light corrections, you can use the brush
in Soft Light mode to focus on these areas. Create a new blank layer by clicking the square with the plus sign at the bottom of the Object Manager (FIGURE J). Select the Paint tool (P), double-click on the Foreground color box, and change the color to white (FIGURE K). In the Property bar, change the brush type to Custom Airbrush, the Nib size to about 250, Transparency to 90%, and Feather
to its max of 100 (Figure K). This will give you a very soft natural brush without any hard edges and allow you to employ the effects incrementally as you click on the image. Change the mode to Soft Light and begin clicking in the darker areas to expose details. If there are areas that need to be darkened, use the same brush but
change the Foreground color to black and paint into the same layer.
The last layer at the top is optional, but keeping this (original duplicate) layer gives you the ability to easily view the original image and the collective effects of the modified layers by toggling the eye icon on and off. To do this, keep the top layer in the Normal mode at 100% opacity.
If you want to experiment with these layers, try adjusting the opacity of each of the layers. Click layers on/ off to see the influence a particular Merge layer has on the overall image. You can also experiment with the effect these layers have by changing the order of the layers—dragging them down or up within the Object Manager. You can also duplicate a layer to increase a layer's effect.
To save this file with all of the
layers intact, go to File>Save As, name the file, and save as file type CPT—Corel PHOTO-PAINT Image.
To flatten the image and save as
a different file type, turn the top layer eye icon off (the eighth layer), go to Object>Combine>Combine
All Objects With Background (Ctrl+Shift+DnArrow), and save as another file type such as PNG, JPEG, TIFF, etc. PNG is my preferred file type.
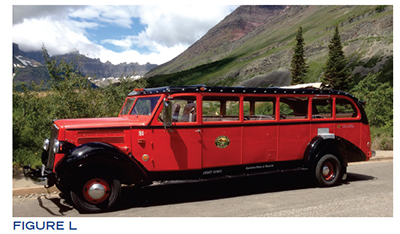
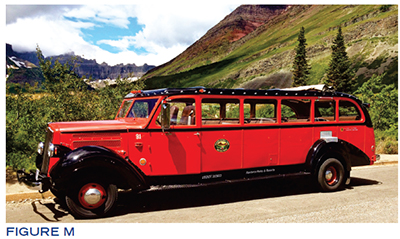
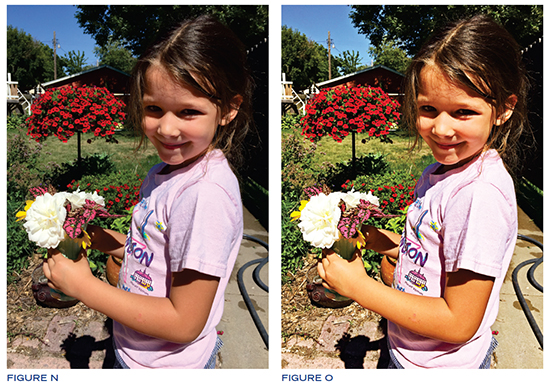
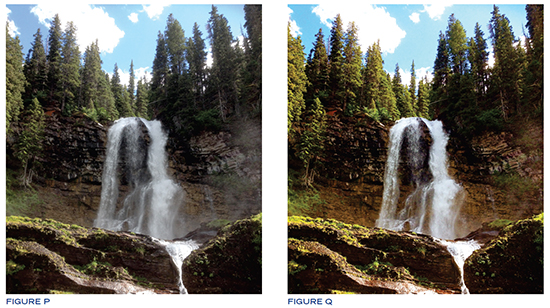
FIGURE L, FIGURE M, FIGURE N, FIGURE O, FIGURE P, and FIGURE Q are side-by-side comparisons of original iPhone photos and photos modified with the steps shown on the previous pages, including the photo from this tutorial.
INCREASING VALUE
If you are given a photo that is a little lackluster or has some lighting issues, your first instinct may be to bring the photo into Corel PHOTO-PAINT or Adobe Photoshop so you can start playing with the saturation or the contrast/ brightness settings to make some quick improvements. This natural drive to want to improve your product beyond your customer's expectations is a good instinct. This is what keeps customers returning to your business. Using Merge modes as an alternative to flat adjustments is a good way
to further elevate the perceived value of the product you create.
WATCH MERGE MODES USED TO FIX PHOTOS
To see a video tutorial from this article and other tutorials, go to www.youtube.com/user/JDSINDUSTRIES.
Shon Roti is a sublimation specialist at JDS Industries, Inc. He has a bachelor of arts degree from the University of Sioux Falls with an emphasis in graphic design. He can be contacted at shonr@jdsindustries.com. JDS Industries is a leading supplier in the recognition and sublimation markets. For more on JDS Industries, visit www.jdsindustries.com.